
Who doesn’t want a nice flat, strong tummy, or core, or abdomen…whatever they’re calling it these days. We all want to look and feel good BUT there’s a lot more to having a strong core than just looking good. Let’s take a look at the benefits of abdominal strength and some yoga poses to get you that tummy you’ve always wanted.

I’m sure you’ve heard it in classes over and over again, “engage your core, strengthen your core, this pose is great for abdominal strength,” but that’s about as far as it goes. So what’s the deal? Why is abdominal strength so important?
Benefits Of Abdominal Strength
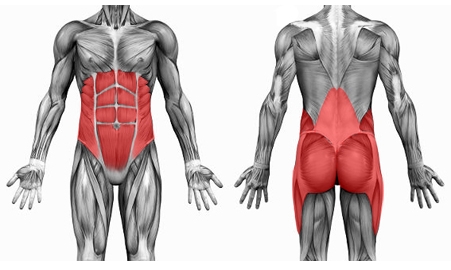
First of all, let’s talk a little bit about your “core.” Your core or abdomen is the center of the body. It consists of muscles in the abdomen, pelvis, middle and lower back, as well as the hips. The core is your center of gravity and it stabilizes the entire body, and also supports the spine and skull. Your core plays a huge roll in everything you do; walking, sitting, exercising, moping or sweeping your floor, lifting a box; you name it, your core is involved and plays a very important role. Below are some benefits of having a strong core:
- Improves Posture – A strong core will allow you to stand tall, shoulders released away from the ears and drawn in towards the spine, not rounded. You’ll find proper alignment with a strong core and good posture.
- Improves Balance
- Reduces Back Pain – If your core is weak you will lack adequate spinal support which can cause back pain. A strong core will allow for proper spinal alignment and support.
- Improves Spinal Alignment
- Better Sports Performance – Since the core is your center of gravity and contains not just your abdomen but also your pelvis, middle and lower back, as well as your hips, all of your movement and mobility stems from your core. It’s the link between your upper and lower body. So imagine that if you’re playing baseball, basketball, hockey, yoga, pilates, etc.; the strength of your core is imperative for top performance.
- Improves Mobility
- Improves Breathing – If you have a strong core you’ll likely improve your posture; if you improve your posture you’ll likely create more space for your airways; thus improving the ability to breath.
As you can see our core is pretty important. Without a strong core we would feel pain in our body and there would be things that we just couldn’t do at all or our performance would be greatly effected. So as far as yoga and core strength goes, what can you do to improve your overall core strength?
Let’s take a look at some poses that could help. As always please consult a doctor before performing a new exercise regime and pay close attention to contradictions before performing any of these poses.
Yoga Poses For A Strong Core
CAUTION:
Please be cautious when performing these poses or consult a doctor before performing these poses if you are experiencing any of the following:
- Disc problems or back problems
- Pregnancy
- Recent abdominal surgery
- Abdominal weakness (will require modifications)
Opposite Arm & Leg Extensions

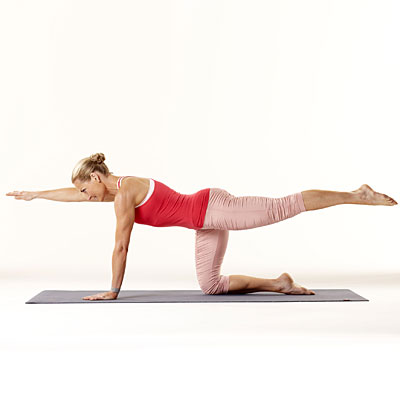
- Start in a table top position. Hands shoulders distance and aligned directly under shoulders. Knees hips distance and aligned directly under the hips
- On an inhale lift your right arm only to shoulders height. Keep the arm straight.
- On your next inhale lift your left leg only to hips height. Keep the leg straight and the toes pointing down towards the floor (flexed foot).
- Your head should be in line with your spine, gaze slightly forward of the hand that is still on the mat
- Draw the belly button in towards the spine. Avoid arching or rounding your back.
- Repeat on opposite side
- Try doing 3-5 of these on each side (or more if you’d like)
Plank Pose

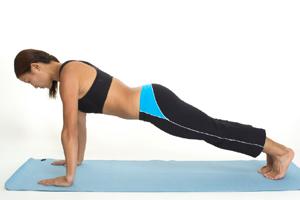
- You can either get into this pose from a table top position by walking the feet back OR you can lower into the pose from Downward Facing Dog
- Hands are shoulders distance and aligned under the shoulders
- Arms are straight, inner and outer arms firm
- Keep the head in line with the spine, gaze slightly in front of the fingers
- Draw the shoulder away from the ears and the shoulder blades in towards the spine
- Engage the lower belly to support the lower back. Keep the belly from collapsing towards the floor
- Feet are hips distance apart. Press back through the heels
- Lift the inner thighs up towards the ceiling, firm outer thigh in
- Try holding this pose for a minimum of 60 seconds and then lower down for 15 seconds and then back up for another 60 seconds. You can do 3-5 (or more) rounds like this, gradually increasing the hold time. Unfortunately the rest time should remain at 15 seconds even if you’re holding the pose for a longer amount of time… I know, it sucks, you’ll thank me later.
Ardha Chaturanga Dandasana on Forearms (Forearm Plank)

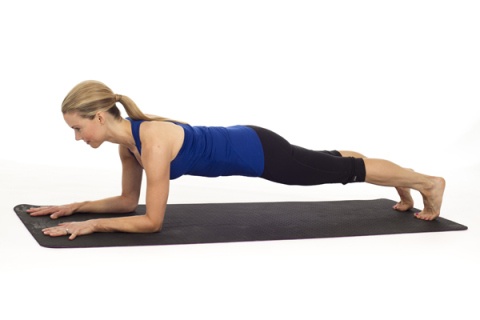
- You can either get into this pose from a table top position, by walking the feet back OR you can lower into the pose from Downward Facing Dog
- Elbows aligned under shoulders
- Forearms and palms shoulders distance
- Draw the shoulders away from the ears and down towards the buttocks
- Draw the sides of the abdomen and waist up
- Press the thighs up and firm the center of buttocks down
- Lift the thighs up towards the ceiling
- Same as above: Try holding this pose for a minimum of 60 seconds and then lower down for 15 seconds and then back up for another 60 seconds. You can do 3-5 (or more) rounds like this, gradually increasing the hold time. Rest time is always 15 seconds even if you’re holding the pose for a longer amount of time.
Chaturanga Dandasana (Four Limbed Staff Pose)

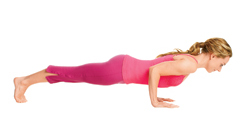
- The easiest way to get into this pose is to lower into the pose from plank
- Shift the weight slightly forward when lowering
- Hands shoulders distance apart, next to the ribs and stacked under the elbows
- Draw the elbows in towards one another, keeping them along the side ribs
- Draw the shoulders away from the ears and move the shoulder blades in towards the back ribs as you lift the shoulder heads up towards the ceiling (shoulder heads should be the same height as the elbows)
- Head is in line with the spine, gaze towards the floor
- Draw the belly button in towards the lower back and engage the torso to protect the back
- Draw the buttocks down towards the heels, frontal hip bones towards the chest
- Legs are straight, thighs lift up towards the ceiling
- Feet hips width apart and toes curled under, root down through the balls of the feet, not the toes
- Same as above: Try holding this pose for a minimum of 60 seconds and then lower down for 15 seconds and then back up for another 60 seconds. You can do 3-5 (or more) rounds like this, gradually increasing the hold time. Rest time is always 15 seconds even if you’re holding the pose for a longer amount of time.
Navasana (Boat Pose)

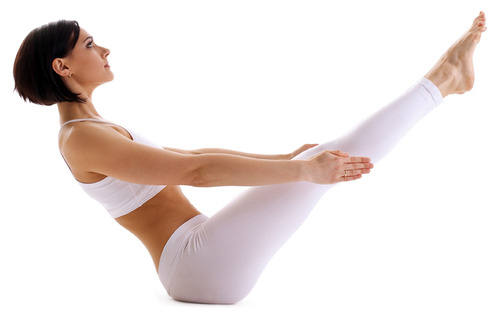
- Balance on the pelvis (slightly toward the back of the buttocks)
- Reach up through the balls of the big toes
- Lengthen the legs away from the pelvis. Legs are straight and active. Outer thighs lengthen towards the feet
- To avoid rounding the lower back gently lift the lower back towards the belly
- Draw the buttocks towards the heels
- Widen across the collarbones
- Arms are straight, draw the arms back into the shoulder sockets
- Look straight ahead
- Same as above: Try holding this pose for a minimum of 60 seconds and then lower down for 15 seconds and then back up for another 60 seconds. You can do 3-5 (or more) rounds like this, gradually increasing the hold time. Rest time is always 15 seconds even if you’re holding the pose for a longer amount of time.
Urdhva Prasarita Padasana (Leg Lifts)

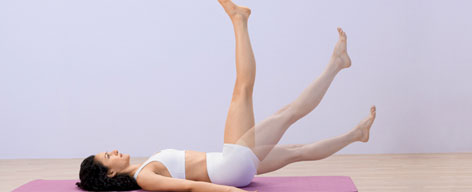
- Lie on your back, you may hold the sides of the mat or just place your palms flat on the floor
- Exhale when you lower the legs and inhale as you lift the legs
- Start with the legs lifted
- You may lower one leg at a time and switch off between the right and left OR you can lower both legs at the same time OR a combination of the two
- Keep the arms alongside the body (You can also fold the arms beneath the body to support the lower back)
- Do not tuck the chin, look up towards the ceiling
- Keep the shoulders on the floor as you lift and lower. Shoulders away from the ears
- Keep the belly soft
- Inner and outer thighs will release down towards the floor evenly
- You may keep one knee bent and lift and lower one leg at a time as a modification
- Do this as many times as you’d like BUT if you do 5 lifts on the right leg make sure to do 5 lifts on the left side, it’s all about keeping the body balanced. 15 seconds of rest in between each round
These are just a few poses of course, but they’re a good start! Follow my blog if you enjoyed this post and you’ll get notifications every time a new blog has been posted. If you have any questions or would like to schedule an appointment you can reach me on my contact page.
Thank you, be well everyone!
Jenna

Published by